Welcome to the second course on the Mule bus. Today we will deal with creating new custom services which will be working in this environment. In this part of the guide, I assume that you already have the application running and a new domain module installed. If not, then go back to the first part of my tutorial.
We will start by creating another module in our application. This time it will be a service that we will configure.
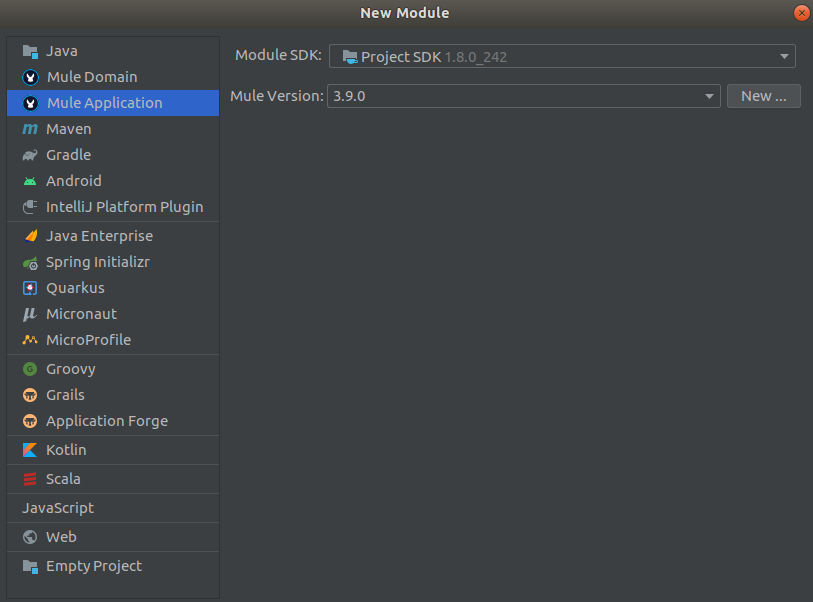
Immediately after creating the module, we must proceed as before:
- remove all items using the mule enterprise version (EE) from pom.xml file
- remove all dependencies and plugins related to Munit from pom.xml file
- replace all enterprise dependencies with the community version in xml file in the app folder of the new service module
- add two dependencies with explicitly declared versions
Also, make sure that the packaging type in the newly created pom.xml file is mule.
<packaging>mule</packaging>If the module has already been configured, you can now bind it to the domain module. To do this, open the mule-deploy.properties file located in the app folder (in the new service module) and replace the domain name with the module name you created during the previous course.
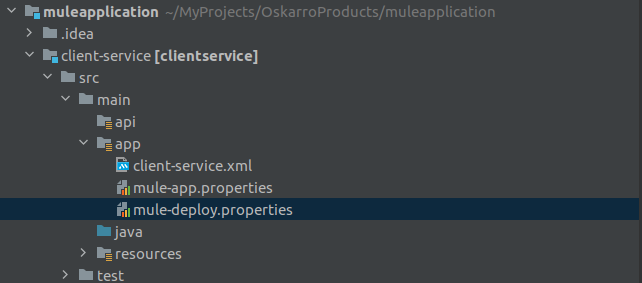

If you have followed all of the above steps, try to rebuild the application. If maven built the packages correctly, make sure that the service jar is in the apps folder (location of the mule environment package). If you want the package to be added automatically to the appropriate folder, you should change the configuration in maven. If MULE_HOME variable is configured then the domain will be copy to domains directory of your mule installation
<plugin>
    <groupId>org.mule.tools.maven</groupId>
    <artifactId>mule-domain-maven-plugin</artifactId>
    <version>1.2</version>
    <extensions>true</extensions>
    <configuration>
        <copyToDomainsDirectory>true</copyToDomainsDirectory>
        <resourcesDirectory>${project.build.directory}/classes</resourcesDirectory>
    </configuration>
</plugin>
If it is not there, manually move it to this folder. Now you can try to run the entire standalone ESB environment. On the below fragment of the mule logs you can see that both the domain and the service have been installed correctly and they are working.
* Started domain 'domain'                                            *
**********************************************************************
INFO  2021-09-07 20:16:29,207 [pool-4-thread-1] org.mule.module.launcher.ArtifactArchiveInstaller: Exploding a Mule artifact archive: file:/home/oskarro/MyTools/szyna/apps/client-service-1.0.0-SNAPSHOT.zip
INFO  2021-09-07 20:16:29,222 [pool-4-thread-1] org.mule.module.launcher.application.DefaultMuleApplication:
++++++++++++++++++++++++++++++++++++++++++++++++++++++++++++
+ New app 'client-service-1.0.0-SNAPSHOT'                  +
++++++++++++++++++++++++++++++++++++++++++++++++++++++++++++
INFO  2021-09-07 20:16:29,224 [pool-4-thread-1] org.mule.module.launcher.MuleApplicationClassLoader: [client-service-1.0.0-SNAPSHOT] Loading the following jars:
=============================
file:/home/oskarro/MyTools/szyna/apps/client-service-1.0.0-SNAPSHOT/lib/lombok-1.18.20.jar
=============================

INFO  2021-09-07 20:16:29,952 [pool-4-thread-1] org.mule.module.launcher.MuleDeploymentService:
**********************************************************************
* Started app 'client-service-1.0.0-SNAPSHOT'                        *
* Application libraries:                                             *
*  - lombok-1.18.20.jar                                              *
**********************************************************************
INFO  2021-09-07 20:16:29,954 [WrapperListener_start_runner] org.mule.module.launcher.ParallelDeploymentDirectoryWatcher:
++++++++++++++++++++++++++++++++++++++++++++++++++++++++++++
+ Mule is up and kicking (every 5000ms)                    +
++++++++++++++++++++++++++++++++++++++++++++++++++++++++++++
INFO  2021-09-07 20:16:29,962 [WrapperListener_start_runner] org.mule.module.launcher.StartupSummaryDeploymentListener:
**********************************************************************
*              - - + DOMAIN + - -               * - - + STATUS + - - *
**********************************************************************
* domain                                        * DEPLOYED           *
**********************************************************************

*******************************************************************************************************
*            - - + APPLICATION + - -            *       - - + DOMAIN + - -       * - - + STATUS + - - *
*******************************************************************************************************
* client-service-1.0.0-SNAPSHOT                 * domain                         * DEPLOYED           *
*******************************************************************************************************
In the current situation, I can say that the mule esb tool is a very complex product, and even a bit too complicated. Why do I think so? We are in the middle of the second half of the course and still have nothing. We’ve successfully launched an application that doesn’t actually do anything (yet). A lot of configuration, adding modules and nothing … Finally, it’s time to implement a sample business case. Are you ready? Let’s start!
Creating REST application
We will create a restful application and issue appropriate endpoints to which you can send requests (e.g. using a postman or even web-browser).
SOA (Service-Oriented) architecture already allows for greater decoupling and therefore evolution to a more diversified architecture, or as they call it, coarse-grained. In the picture you can see the original architecture of Mulesoft. ESB allows to centralize all the business logic and allows the connection between services and applications regardless of their technology or language in a fast and simple way.
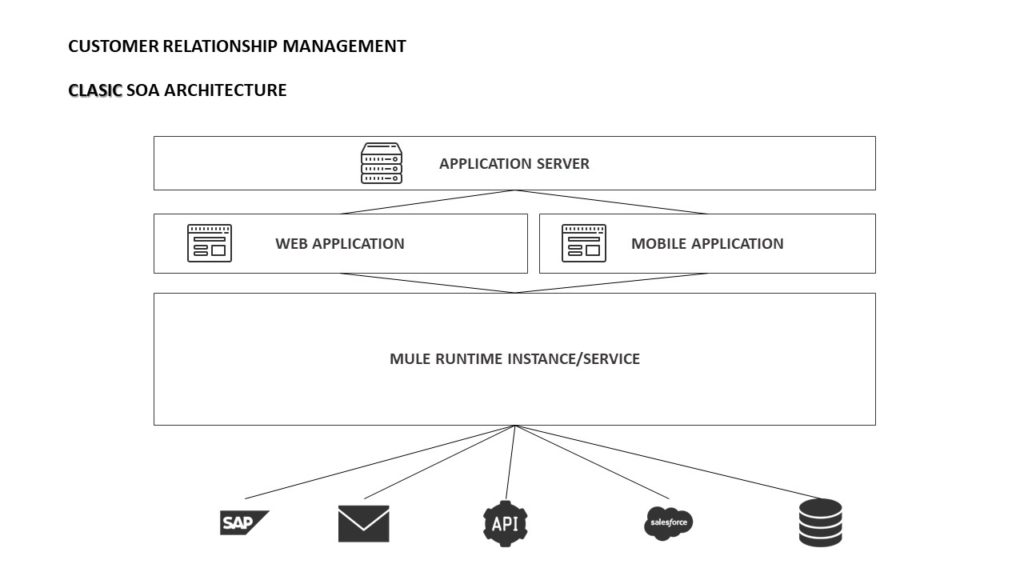
Before we deal with the implementation of flow in the esb mule, we need to define the schema of our API. Knowing RAML will come in handy when working with Mule. RAML is open-specification and the initiative has been taken by MuleSoft. If you have never dealt with the definition of RAML or would like to learn more about it, please click here -> [TUTAJ_LINK]. Using RAML we will define the basic endpoints and types of objects on which we will work (they will be visible from the mule level).
First, I will show you the RAML file and below I will describe what is in it. This RAML file should be in the module of our service (first-service in my case) in the api folder. My RAML deals with designing APIs for an first service that has the following operations:
#%RAML 1.0
title: Bank Accounts
version: v1
baseUri: http://localhost:8081/api/first

types:
  Player:
    properties:
      id: string
      name: string
      playerType: string


/player:
  description: Collection of players
  get:
    responses:
      "200":
        description: Players found
        body:
          application/json:
            type: Player[]
            example: |
              [{
                "id":"3133313",
                "name":"dssadsd",
                "playerType":"313123"
              }]
  /{playerId}:
    uriParameters:
      playerId: string
    get:
      responses:
        200:
          body:
            application/json:
              type: Player
The main advantage of using RESTful services is using HTTP methods for operations. The beauty is that it is light-weight and supports JSON and XML. My RAML deals with designing APIs for an first service that has the following operations:
| Operation | Resource URI | HTTP Method |
| Get Players | /player | GET |
| Get Player by id | /player/{playerId} | GET |
First, we need to specify RAML version and then the title of the service, the version of the service, and the base URI details as below:
#%RAML 1.0
title: Bank Accounts
version: v1
baseUri: http://localhost:8081/api/first
Next, I will define my first operation (“Get Players”) as shown below:
/player:
  description: Collection of players
  get:
    responses:
      "200":
        description: Players found
        body:
          application/json:
            type: Player[]
            example: |
              [{
                "id":"3133313",
                "name":"dssadsd",
                "playerType":"313123"
              }]
As you can see, I can capture everything needed for the operation “Get Players”. I have defined the resource URI for the operation (/player) and specified the HTTP method that will be used to invoke the operation and sample responses for 200 and 404. I could mention the content type and description of each method. This is the beauty of defining RAML before actually coding.
Similarly, my other operation design will be as below:
/player:
  description: Collection of players
  get:
    responses:
      "200":
        description: Players found
        body:
          application/json:
            type: Player[]
            example: |
              [{
                "id":"3133313",
                "name":"dssadsd",
                "playerType":"313123"
              }]
  /{playerId}:
    uriParameters:
      playerId: string
    get:
      responses:
        200:
          body:
            application/json:
              type: Player
When you go through the whole RAML file, you will understand the intention of the API and the operations supported.
RAML contains API specifications like Resources, HTTP Methods, Traits, Query Parameters, URI Parameters, and JSON request and response schemas. In API implementation, Mule provides APIkit Router for routing messages, serializing responses, and validating payloads, headers, query-params, and URI-params against the RAML. To connect these two instances (raml and mule) we need to use mule router. Let’s add appropriate annotations to our service and implement APIKit in xml file.
xmlns:apikit="http://www.mulesoft.org/schema/mule/apikit"
xsi:schemaLocation="
        http://www.mulesoft.org/schema/mule/apikit http://www.mulesoft.org/schema/mule/apikit/current/mule-apikit.xsd
<apikit:config name="first-config" raml="first.raml" consoleEnabled="false" />The API Kit Router validates the incoming request against the API RAML definition only for the parameters defined in the RAML specification and doesn’t validate any parameters which are not defined in the RAML specification.
If we want to communicate with the ESB application via HTTP, we must add an appropriate connector that has built-in methods to handle this type of request. The HTTP connector can send and receive HTTP and HTTPS requests given a selected host, port, and address. So let’s add the appropriate attribute to the mule-domain-config.xml file, and then initialize the appropriate configuration.
xmlns:http="http://www.mulesoft.org/schema/mule/http"
xsi:schemaLocation="http://www.mulesoft.org/schema/mule/http http://www.mulesoft.org/schema/mule/http/current/mule-http.xsd"
When defining the configuration, we give the name of our settings, which will enable its later inheritance. We also define the host and port to which we will send the requests:
<http:listener-config name="HTTP_Listener_Configuration" host="0.0.0.0" port="8081"/>So far, we have defined general domain configuration. Now it’s time to build the service. Before setting specific endpoints, add the first general flow that will be triggered every time each site starts:
    <flow name="first-serviceFlow">
        <http:listener config-ref="HTTP_Listener_Configuration" path="/api/first/*" />
        <apikit:router config-ref="first-config"/>
        <logger message="First service has been started..." level="INFO"/>
    </flow>
Breaking up flows into separate flows and subflows gives us a lot of benefits. First of all, it makes the architecture more intuitive and flexible. Now we can create the first flow on our service (it must comply with the RAML definition).
<flow name="get:/player:first-config">
    <set-payload value="THIS IS PAYLOAD" />
    <logger message="PRINT #[payload]" level="INFO"/>
</flow>
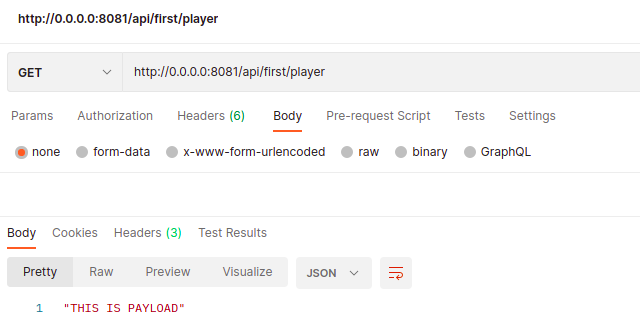
After adding this flow on the xml service file, we can rebuild our project, update the packages in the Mule environment and start the machine. If everything went correctly we can send the request to the defined endpoint. You should see the following information in your service logs (the file is in the logs directory).
2021-09-08 15:41:40,374 [[domain].HTTP_Listener_Configuration.worker.01] INFO org.mule.api.processor.LoggerMessageProcessor - PRINT THIS IS PAYLOAD
There you have it! We have seen how an HTTP connector works as a listener. Due to the fact that we have set a specific value as payload, the response value returned by the application should be as follows:
In addition to flow, we also have sublows. Subflows are executed exactly as if the processors were still in the calling flow. They always run synchronously in the same thread. All in all, subflow is a normal flow without any message source. Here is how it looks in XML configuration:
<sub-flow name="subFlow">
    <logger message="Print information about subflow" level="INFO"/>
</sub-flow>
A subflow can be called by the flow-reference element of Mule. When the main flow (calling) calls the subflow using the flow-reference element, it passes the whole message structure (message properties, payload, attachments, etc) and the context (session, transaction, etc). Everything in the subflow behaves as if it were in the same flow. It’s important to note that the message is executed in the same thread.
Private flows are same as standard flows without the message source. They can also be called using the flow-reference element. This is how it looks in XML configuration:
 <flow name="privateFlow" processingStrategy="synchronous">

 </flow>
Private flows are different from subflows in terms of Threading and Exception Handling. They have their own Exception Handling. The exception will be trapped by the local Exception Handling and it will not be propagated to the main flow. It means that if an exception occurs in a Private flow and it is handled properly when the call goes back to the main calling flow, the next message processors continue executing. Private flows also receive the same message structure from the main calling flow. But Private flows create a new execution context.
A MuleMessage is the object used to pass any data through Mule flow. MuleMessage consists of three parts:
- Header, which contains set of named properties,
- Payload, which actually contains message or data,
- Attachment
A Variable is used to set or remove a variable on message. The Scope Variable is limited to the flow where it is set. When a message leaves the flow, the variable doesn’t carry to next flow or application.
Flow Variable
The Flow Variable is used to set or remove the variable tied to message in current flow. Variables set by flow variable transformer persist for the current flow and cannot cross the transport barrier. The Flow Variable can be accessed in current flow, calling flows (sub flow/private flow) and even their child flows.
The Flow Variable can be accessed using syntax #[flowVars.Id] if the Id is the name of flow variable:
<flow name="defineFlowVariable">
    <set-variable variableName="myVariable" value="This is code" />
    <logger message="Printing variable: #[flowVars.myVariable]" level="INFO"/>
</flow>
Session Variable
The Session Variable is used to set or remove the variable tied to current message for its entire lifecycle across multiple flows and even servers. Variables set by the Session Variable transformer persist for the entire lifecycle regardless of transport barrier. The Session Variable can be accessed in current flow, calling/child, flow within the entire project, and even JVM systems.
Session Variable can be accessed using syntax #[sessionVars.Id] if the Id is the name of the Session Variable:
<flow name="defineSessionVariable">
    <set-session-variable variableName="myVariable" value="This is code" />
    <logger message="Printing variable: #[sessionVars.myVariable]" level="INFO"/>
</flow>
Property
The Property is used to set, remove, or copy the properties on the outbound scope of a message. Once a message hits an outbound connector, all properties in the outbound scope are sent with the message in the form of transport-specific metadata (HTTP headers for an HTTP outbound-connector, for example).
<flow name="defineProperty">
    <set-variable variableName="myVariable" value="#[message.inboundProperties.'http.query.params'.id]" />
    <logger message="Printing variable: #[flowVars.myVariable]" level="INFO"/>
</flow>
Mule Message Data and Expression Language
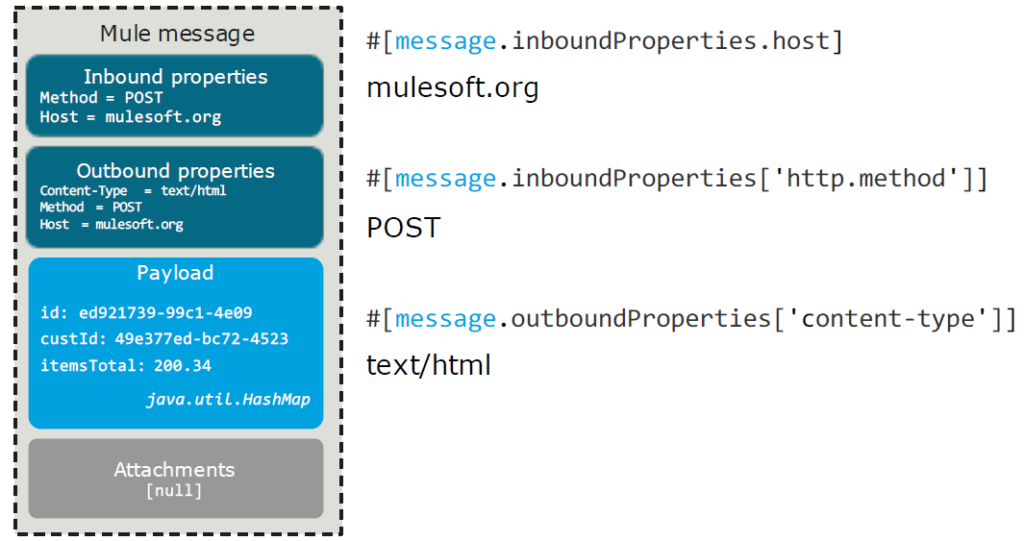
I will show you also, what is the Mule Express Language (MEL) and how we can use it. What’s more in this part, I will describe, how to use the data generated by Mule Message. Generally, Mule message is a core part of mule applications. Message processors may or not may modify Mule message. The image below shows where the value data comes from:

| Data type | Information |
| Inbound message properties | -Set from message source -These message are read only -Persist throughout the flow -Query parameters, URI parameters, Method name, and Content-type are examples of inbound properties. |
| Outbound message properties | -We can use the Set Property transformer to set outbound properties -Read/write access -Can set, remove and copy |
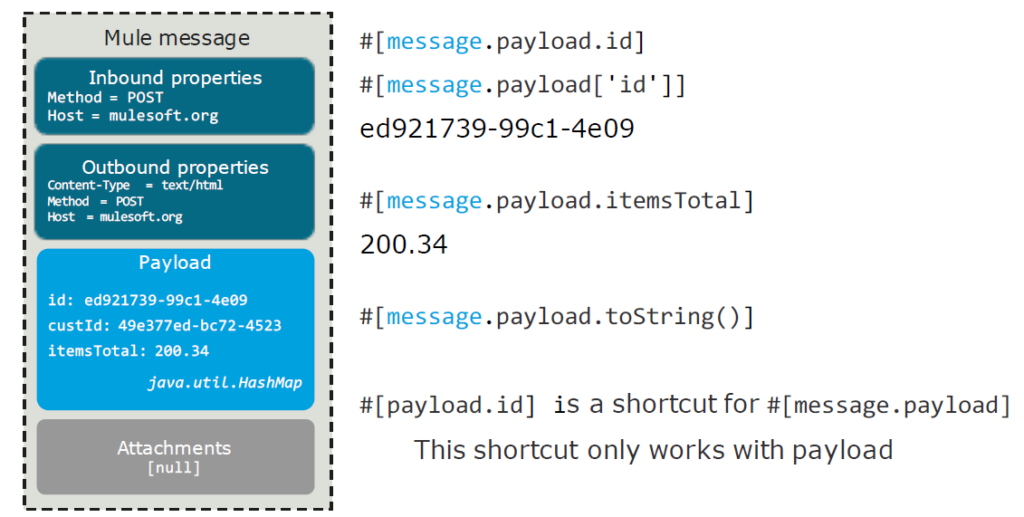
| Payload | -This is a core part of Mule Message -We can use Set Payload to modify payloads accordingly |
We should use MEL to access and evaluate the data in payload, properties and all variables of a Mule message. It’s good to know that MEL is lightweight and it can be use to modify the way the processors act upon the message such as routing or filtering. Remember that MEL is case-sensitive!
Are you wondering how to choose a specific variable? You will find everything in the pictures below:
Choice flow control
The choice flow control dynamically routes messages based on message payload or properties. It adds conditional programming to a flow, similar to an if/then/else code block. A choice flow control uses expressions to evaluate the content of a message, then it routes the message to one of the routing options within its scope.
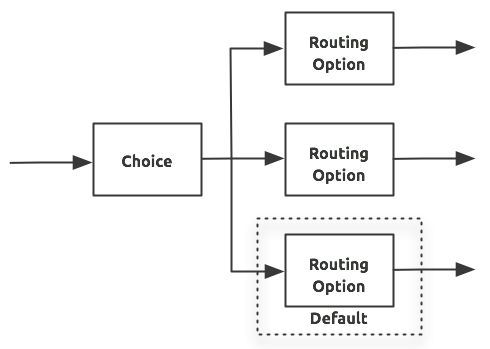
For example, let’s say that you want to route purchase order to different clients on the basis of Client name. You can add any quantity of options. As a value to be checked, the value of an attribute from a URL can be called every time, but in my opinion it is much better to write this value to an independent variable. Choice flow control will route the message to correct destination depending on the clientName value
<flow name="get:/client/{clientName}:first-config">
    <set-variable variableName="clientName" value="#[message.inboundProperties.'http.query.params'.clientName]"/>
    <choice doc:name="Verify customer name">
        <when expression="#[flowVars.clientName == OskarClient]">
            <set-payload value="This is Oskar client"/>
        </when>
        <when expression="#[flowVars.clientName == DavidClient]">
            <set-payload value="This is David Client"/>
        </when>
        <otherwise>
             <set-payload value="Unknown client..."/>
        </otherwise>
    </choice>
</flow>
Integration of services using JMS Transport with Active MQ
Sometimes it happens that we want to use more than one service – e.g. send information from one flow to another. We can use the popular JMS transport to exchange data between services and to trigger flow processes from another service. Generally, all connectors provide an abstraction layer over data transport mechanisms. JMS (Java Message Service) is a widely-used API for Message Oriented Middleware. It allows communication between different components of a distributed application to be loosely coupled, reliable, and asynchronous.
JMS supports two models for messaging:
- Queues – Point-to-point
- Topics – Publish and subscribe
Mule’s JMS transport lets you easily send and receive messages to queues and topics for any message service which implements the JMS specification.
Apache ActiveMQ is a popular open source messaging provider, which is easy to integrate with Mule. MuleSoft provides out of the box support for ActiveMQ.
In our example, we wiil use an HTTP connector and a JMS connector. The HTTP connector would provide the message receiving infrastructure in the form of a dedicated listener on a particular port. The JMS connector would provide the capacity to connect to the target JMS provider (through its specific connection factory) and to handle the dispatch of messages to the desired queue.
To do this we first need to add dependencies to the pom.xml file in the domain module.
        <dependency>
            <groupId>org.apache.activemq</groupId>
            <artifactId>activemq-broker</artifactId>
            <version>5.14.0</version>
        </dependency>
        <dependency>
            <groupId>org.apache.activemq</groupId>
            <artifactId>activemq-kahadb-store</artifactId>
            <version>5.14.0</version>
        </dependency>
        <dependency>
            <groupId>org.apache.activemq</groupId>
            <artifactId>activemq-all</artifactId>
            <version>5.11.1</version>
        </dependency>
After downloading these libraries, we can add this broker in the mule-domain-config.xml. We need to add the attributes in the header of the xml file and add a fragment responsible for initializing this connector.
xmlns:jms="http://www.mulesoft.org/schema/mule/jms"
xsi:schemaLocation="http://www.mulesoft.org/schema/mule/jms http://www.mulesoft.org/schema/mule/jms/current/mule-jms.xsd
<jms:activemq-connector name="Active_MQ" specification="1.1" brokerURL="vm://localhost" validateConnections="true" durable="true"/>
In the above XML Configuration, we first define ActiveMQ Connector with broker URl that is required to pass message to the JMS Queue. If the domain module detects this connector correctly, we can use it inside any flow in the service module.
    <flow name="get:/player:first-config">
        <set-payload value="THIS IS PAYLOAD" />
        <first-connector:print-string config-ref="FirstConnector_configuration" />
        <jms:outbound-endpoint queue="IN_QUEUE" connector-ref="Active_MQ" />
    </flow>
<flow name="userGateway">
<jms:inbound-endpoint queue="IN_QUEUE" connector-ref="Active_MQ" />
<logger message="This is gateway : " level="INFO"/>
</flow>Here we have inbound and outbound endpoints. The message is passed from inbound endpoint to outbound endpoint. In this example, flow called on the first service tries to call flow from the second service.
Then open postman or even browser and hit the URL http://localhost:8081/player. You will see that there is new message in the queue and you will see new logs from both services.
